
A while back, I came up with this pattern for my Celtic Carryall purse, and I've decided to list it here as a free pattern for all of you!
This is a great bag; it's roomy and fashionable! Though this bag doesn't necessarily need a lining (I have been using mine without one), I know many of you like your crocheted bags lined. I will eventually get a tutorial up on how to line a bag, but for now, here are a few links to other sites that will show you how:
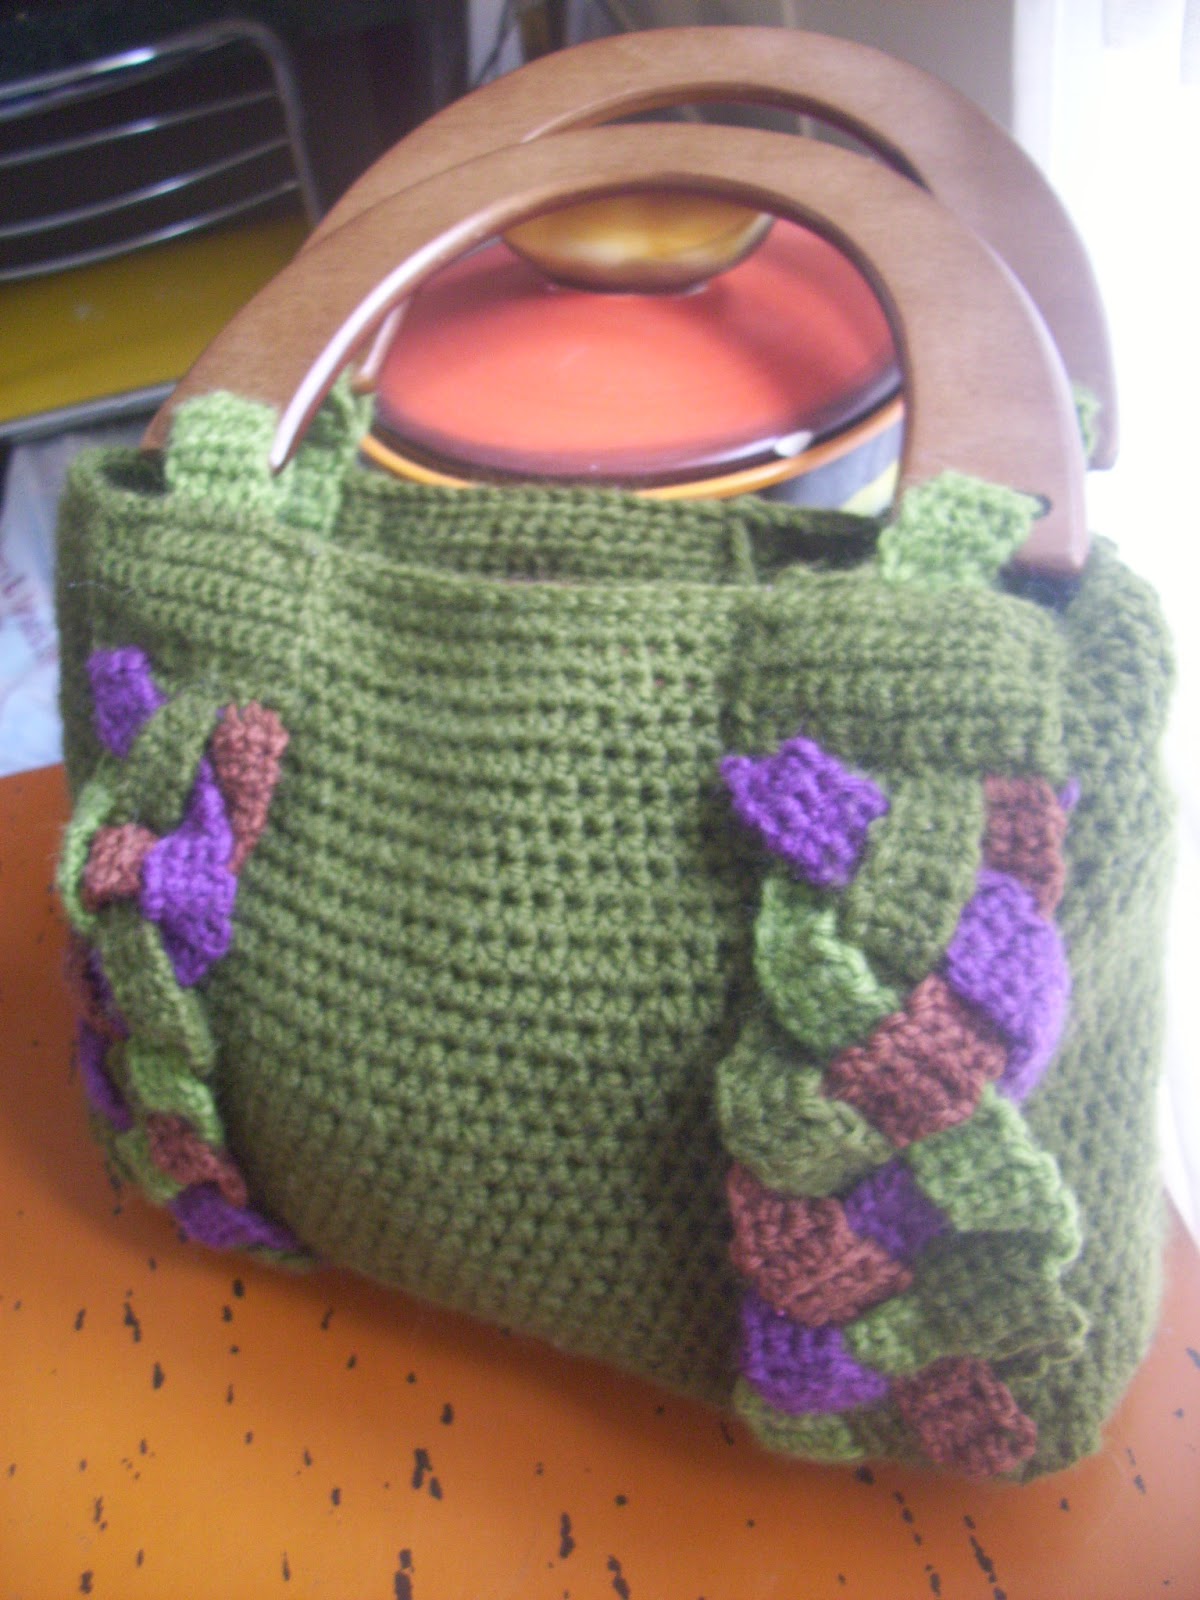
The bag is fairly simple, and includes a few handle options too. I used wooden handles that I purchased at Joann's Fabrics, but you can crochet your handles too.

Here is the pattern:
*Note- I used Lion Brand Wool Ease to create this bag, though any medium worsted weight yarn
would do. I recommend using one that is more stiff however, to hold the shape of the bag
better. Red Heart Super Saver is a perfect cheaper alternative.
Your bag size will depend entirely upon what yarn you use, but the dimensions will be roughly:
12" x 8.5"
A basic understanding of the following stitches are required for this pattern: slip stitch, single crochet, half double crochet and half double crochet decrease
Abbreviations:
ch- chain slst- slip stitch sc- single crochet hdc- half double crochet
hdc dec- half double crochet decrease
Materials:
Medium worsted weight yarn in 3-4 colors
G Hook
H Hook
J Hook
Yarn needle (for sewing the strap and embellishment pieces and all tails)
Additional Materials(optional):
The following materials are commpletely optional, but make nice additions to
complete your bag. There are many free online tutorials for adding a lining
to a crocheted purse.
Wooden handles (can be found at most craft stores)
or
4 rings for attaching shoulder straps (also found at most craft stores)
Fabric for lining
Magnetic button closure(or some other form of closure: button, zipper, snaps, etc.
Leather or thick/heavy fabric for bottom
Using J hook
Row 1: ch42, hdc in second ch from hook(counts as first hdc), hdc across(42hdc)
Rows 2- 13: ch2, turn, hdc in each st(42hdc)
Switch to H hook
You will now be working in the round with joins....
Round 1: ch1, turn and sc down the short side first(12sc total), working 2sc in corner
stitch(one for each side), sc down the long side(41sc counting corner st), repeat for
the remaining two sides, join with slst (There should be 12sc on each short side and
41 on each long side, with 2sc's in each corner)
Rounds 2-3: ch1, hdc in same st, hdc around (12),41, (12), 41, join with slst
Round 4: ch1, *hdc dec in same st, hdc 8sts, hdc dec*, hdc 41, repeat from(*), hdc 41,
join with slst
Round 5: ch1, hdc in same st, hdc around (102hdc)
Round 6: ch1, hdc in same st, hdc in next 33sts(34total, counting first st), hdc dec, hdc
in next 45sts, hdc dec, hdc in remaining sts (100hdc)
Rounds 7-26: ch1, hdc in same st, hdc around, join (100hdc)
Round 27: ch1, sc in same st, sc around, join (100sc)
Round 28: slst around, join, cut and tie off. Sew in tail.
Straps:
There are 3 options for straps on this bag.
The first option (pictured) is adding two wooden handles.
The second is done in a similar fashion, but uses 4 rings to connect two shoulder straps.
The third uses no rings, and is achieved by making two shoulder straps of sc.
Option 1:
Using G hook, main color, make 4
Row 1: ch13, sc in 2nd ch from hook and across (12sc)
Rows 2-9: ch1, turn,sc across (12sc)
Row 10: slst in first 4sts, hdc in next 4, slst in next 4, cut (leaving a long tail for
sewing piece to bag) and tie off
Sew these pieces to your bag, 2 in the front, 2 in the back. Make sure you only sew
down the sides of the front pieces(you will sew down their bottom edges later), so you
can attach your braided embellishments.
Using G hook and second color, make 4
Row 1: Join to first hdc at top of last piece, ch1 and hdc in same st, hdc across (4hdc)
Rows 2-12: ch1, turn, hdc across
Cut and tie off, leaving a small tail for sewing.
Celtic Braid Embellishment:
Using a G Hook, attach these to 2 of your wide strap attachment pieces
You will need all of your colors here (if using just 3 colors, you will have to double up
on one, but I recommend spacing them from each other.)
Color 1:
join with slst to first sc, ch1 and sc in same st, sc in next two sts,* ch1, turn, sc across
3sts*, repeat from (*) for about 40 rows (count may differ slightly once you braid the
pieces together, so leave long tails and don't tie off till braided. You will also need the
tails to sew the pieces down.)

long pieces on each. Simply braid the pieces till you've reached the bottom of the bag.
Then you will use their tails and yarn needle to tie and sew them down to the bottom
edge of the front of the bag.
You may also finish sewing your front pieces down on their bottom edges.
Assembling your strap handles:
Once you have sewn all of your strap pieces to the outside of your bag, slip your thin
strap pieces through your handle holes, and sew them down on the inside of your bag.

Option 2:
Repeat the above process for option 1, merely changing out your wooden handles for
4 rings.
Using H Hook, Make 2
When making your slip knot, leave a long tail for sewing to itself around ring.
ch 7, turn, sc across (6sc)
ch1, turn and sc across until you achieve the desired length of your strap. Cut, leaving a long
tail, and tie off.
Wrap the ends of the strap around the rings, and sew shut. Cut and weave in tails.
Option 3:
Using G hook, main color, make 4
Row 1: ch13, sc in 2nd ch from hook and across (12sc)
Rows 2-9: ch1, turn,sc across (12sc)
Row 10: slst in first 4sts, hdc in next 4, slst in next 4, cut (leaving a long tail for
sewing piece to bag) and tie off
Sew these pieces to your bag, 2 in the front, 2 in the back. Make sure you only sew
down the sides of the front pieces(you will sew down their bottom edges later), so you
can attach your braided embellishments.

Attach your embellishments, and pin down your front pieces as above.
Using H hook, join yarn(in strap color of your choice) to first st of top hdc, hdc across,
ch2, turn, repeat untill you achieve the desired length. (2x)
Leave a long tail at the end to attach to the top hdc on the other side.
I hope you enjoy this pattern, and if you have any questions, feel free to comment here or email me ( cavendishclassiccrafts@gmail.com ) anytime. This has been tested, but there is always the possibility for error, so just let me know if you find any.
I would love to see your finished bags too, so please feel free to share links to your photos in the comments or post your pics on my facebook page!
This is so beautiful! Thank you for sharing this here and on Ravelry!
ReplyDeleteThank you so much! I am glad you like it. Please feel free to share your finished project(s) with me on Ravelry; I'd love to see it worked up by others.
Delete