Sunday, March 17, 2013

Happy St. Patrick's Day

 Happy St. Patrick's Day!
I threw together a quick and easy headband pattern for you all!  I figured you could accent them with those cute shamrocks from the other day.
Also, I currently have 3 of my 10 patterns listed for just $1, for today only!  Check out both my Craftsy and Ravelry shops for the sale.
 My daughter was not being very cooperative for the photo shoot(heehee).  Do you see that look she's giving me?  I think her love of hats does not extend to headbands, but oh well.  I can fit it on my head, albeit a bit more snugly, but it fits.
 The pattern is really simple, it's basically just a series of half double crochet worked in the back bottom loop only.  It gives it that "knit" look.

You will need an N hook and super bulky yarn(I went with green in honor of St. Paddy's Day).
Begin with a chain(the number will vary based on your head size, so you'll want to measure).  I did a ch41, and then I joined to form a loop, which will bring your stitch count to 40 as you go around each row.
One round of half double crochet(hdc).  Then when you come around, you will join in the back bottom loop of the beginning stitch.  Ch1, and hdc in same back bottom loop.  Continue to hdc around like this, working in those back bottom loops only.  Join as you did before.
Do three rows of this, or really as many as you want to achieve the desired width of your headband.  Cut and tie off.  Hide your tails in your work.
Accent with the applique, pin, hair clip of your choice, and TA-DA!

I had to model this one, as my daughter had at this point given up.lol

There it is; your knit style, crocheted St. Patrick's Day headband, complete with shamrock hair clip!
May the Irish hills caress you.
May her lakes and rivers bless you.
May the luck of the Irish enfold you.
May the blessings of Saint Patrick behold you.
-Irish Blessing

Saturday, March 16, 2013

Pattern News and Paddy's Day Sale

 I have been working on this purse for some time.  Well, I should say, I started this a while ago, and it sat for some time.  I finally picked it up to finish it today.
 The front of the bag is accented with 4 stranded braids on each side.

 I used some wooden handles, and I plan to add a fabric lining, magnetic button closure, and leather bottom.
This bag is fully functional without all of those extras, but I found the perfect fabric for the lining, and a bunch of my mom's leather scraps that she had been holding onto for years.  I think it's going to look even more awesome when it's finished!

 I am typing up the pattern and hoping to get it out to a couple of testers this week.  I had originally planned to release the Celtic Carryall in time for St. Patrick's Day, but that did not happen.  I think this bag is fabulous anytime of year though.


I've decided to run a little sale in my pattern shops tomorrow for St. Patrick's Day.  For the entire day, the following patterns will be on sale for just $1!

Slouchy Shells Fingerless Gloves(available on Craftsy and Ravelry
 The Aurora Slouchy(available on Craftsy and Ravelry)
 and Egg Hunt, which is normally just $2, will also be just $1 all day tomorrow!(available on Craftsy and Ravelry)


In honor of St. Patrick's Day, I am putting together a little tutorial on this headband, which I accented with my Shamrock.
Have a happy, healthy and safe holiday!  Happy crocheting!


For each petal on the shamrock.
This brings a wish your way
Good health, good luck, and happiness
For today and every day.
-Irish Blessing

Friday, March 15, 2013

Crochet,Fun With Clay, and Egg Play

 I am surrounded by wips!  Haha, but seriously, I have so many current project in progress, it is ridiculous.  I definitely have crocheter's ADD.  I will be working on something, get the idea for something else, and I'm off....
 I have been working on a granny square tunic/sweater for my daughter and a matching hat.  The first hat I made wound up being a smidge to small.  I have been testing my gauges and patterns with different yarns, and the result was a 6-12 month Rosalie Slouchy.  This worked out wonderfully, because one of the fabulous sewists over at Modia Diapers saw it, and wanted to do another trade with me.  We did one over Christmas, where I sent her two amigurumis for a cloth diaper and wipes for my daughter.  I jumped at the chance to trade for more of her amazingly soft sherpa/obv wipes!
 I have been wanting to play a little with some aqua-ish blue and bright red.  Love the two colors together, and treated myself to some yarn the other day.  Here is the result: another Rosalie Slouchy!  I am on a roll making these in every color combo I can think of.  The adult size version of the pattern is coming soon.
 We had a little clay play the other night, and I can honestly say that I will not be making any of these items to sell ever!  I have so much respect for those of you out there who can work with clay.  I am not one of those people.lol
This big button was the best looking of my button attempts, and it's terrible.  Oh well, we had fun, and that's what counts.  I also made some simple hook handles, which are nothing special, but they do the trick and I like them.

 They still need a glaze coat on them, which I think I will leave up to my hubby tonight.  I quit the clay business.  Back to crochet for me.
 Here is another project I decided to start yesterday.  I am using up all of my pastel yarn scraps and crocheting a cover for this foam wreath I bought.

 I thought I would make a festive Easter wreath.  I crocheted a little egg, made a little bunny head using up scrap yarn and a pipe cleaner, and bought a new flower pattern from Crocheterie.
 I will share more pics as it progresses, and hopefully it is finished in time for Easter.
 Here is the simple little bunny head.
 Staying with the Easter theme, we decided to try out egg dyeing with our daughter.  She was just a little too rough with some of the eggs, and I think next year will go smoother, but we all had fun.
The above was my attempt at drawing a yarn ball and hook on one egg.  Not so great, but oh well.
My daughter requested a heart on the egg.  They came out pretty cute, and tonight we have our name eggs ready for some egg bashing!  Does anyone else do that?  You hit your egg into everyone else's and whoever doesn't break theirs wins.  It's a tradition in my hubby's family (I had never heard of it before we met).

I think we'll save the plastic eggs for Easter, and we may have to hide them in the house this year, as it is currently snowing out(with feet remaining).

Have you done any holiday decorating or crafting?  Do you have any fun Easter or St. Patrick's Day traditions?  Please feel free to share(that way I don't feel like I'm just talking to myself, heehee).

Thursday, March 14, 2013

Shamrock Tutorial

St. Patrick's Day is just a few days away, so I though this little shamrock tutorial might be fun!


Here's what you'll need....
Materials:
Green worsted weight yarn
12" pipe cleaner (shade of green preferably)
I hook
Scissors


 Tie a slip knot, insert hook in loop and slip stitch around one end of pipe cleaner, leaving about 1/2"-1" of the end uncovered.  Ch2, and begin working hdc's around the pipe cleaner(going over your yarn tail at the same time).  Work about 75 hdc.
 Every now and then, as you work, scunch(that's right scunch, or push your stitches closer together in a bunch), so that you can fit all 75.  Once done, form a loop by twisting the exposed ends together, making sure to leave one end just a little longer.(You will need that little end piece to hold down your yarn later)
 From that loop, form 3 smaller loops and make little indents in the center of each.  You may need to move around your stitches and bunch them a little differently to shape your shamrock just right.
 Take your hook and slip stitch the inner shamrock corners together one at a time.  Bringing your hook up at the bottom center, just above the stem at the end.
 Begin working sc stitches down the stem until you reach the point where the twisted points end.  Fold the little pipe cleaner tab over the backside of the stem.
 Insert hook through stitch above tab, slip stitch.  Pull loop around front of stem, insert hook in stitch and slip stitch.  Cut and tie off.  Weave the tail of yarn in and out of the stem to hide.
 There you have it!  A fun little shamrock, and each one a little different.  These are lots of fun, work up quick, and there are so many things you can do with them!
 Attach them to hair clips, hats or headbands.  Make napkin rings or a pin to wear. Perhaps a garland.....

The possibilities are many, so have fun creating these quick and easy shamrocks!

Wednesday, March 13, 2013

WIP Wednesday

It's already Wednesday!  This week has been flying by!  I just released my two newest patterns, Rosalie Toddler Slouchy and Egg Hunt, on Craftsy and Ravelry.  I am really trying to get the adult sized Rosalie Slouchy typed up and out to testers, finish a new cushion cover pattern to complement the Coastal Kaleidoscope Throw(also on Craftsy and Ravelry), make some fun Easter items for my little girl, and get some items made up for another product shoot.
Of course, as always, I get so easily distracted and wind up starting a new project.  I have been so inspired by my Coastal Kaleidoscope pattern as of late, that I have created several new patterns.  For example, the Rosalie Slouchies both got their start with that throw pattern, the cushion cover in progress was created to accent it, and now I have done it again!  I started off with every intention of making a hat, but it morphed into a granny, which grew and grew, and is now becoming a sweater/tunic for my daughter.

 I have the front side finished and will be making the back now.  Hopefully it turns out as I see it in my mind.  Sometimes these things don't quite go according to plan, but I am loving the colors, and it can always morph into something else if need be.
If my plan goes well, I will be making a matching hat to go with this tunic/granny sweater.  Perhaps a pattern or tutorial will come of this......

 My daughter just had to be a part of this photo shoot.lol
I don't know how many of you have ever tried taking photos with a two year old running around, but it's not always easy.  She has recently developed a love for the camera, and would rather me take pictures of her dolls and hands then my items.  She also much prefers taking her own pictures entirely.  Thinking she needs her own camera.
This little shamrock will be a tutorial within the next few days probably.  I was going to post it on St. Paddy's Day, but figured you'd want to be able to make them before then.  They are really quite simple, and only require worsted weight yarn, an I hook, and a pipe cleaner.  They take maybe 15 minutes tops, and you can do so much with them.  They would make excellent hair clips, appliques for hats and headbands, pins, accents to a decorative wreath, napkin rings, etc.
What are you working on this week?  Is anyone making anything fun for St. Patrick's Day or Easter?  I would love to see your pictures, crochet and other, so please feel free to post them on my facebook page!
Happy crocheting!

Tuesday, March 12, 2013

Easter Chick-Free Pattern


 As promised, here is a little pattern/tutorial to make your very own cuddly crocheted Easter chick!  I usually like to make mine with this fun super soft, yellow microfiber yarn.  It's so soft and baby chick-like, but as I ordered it from a specialty shop online, I realize others may not have access to something of its kind.
So I worked this pattern using a pastel mix from Red Heart.
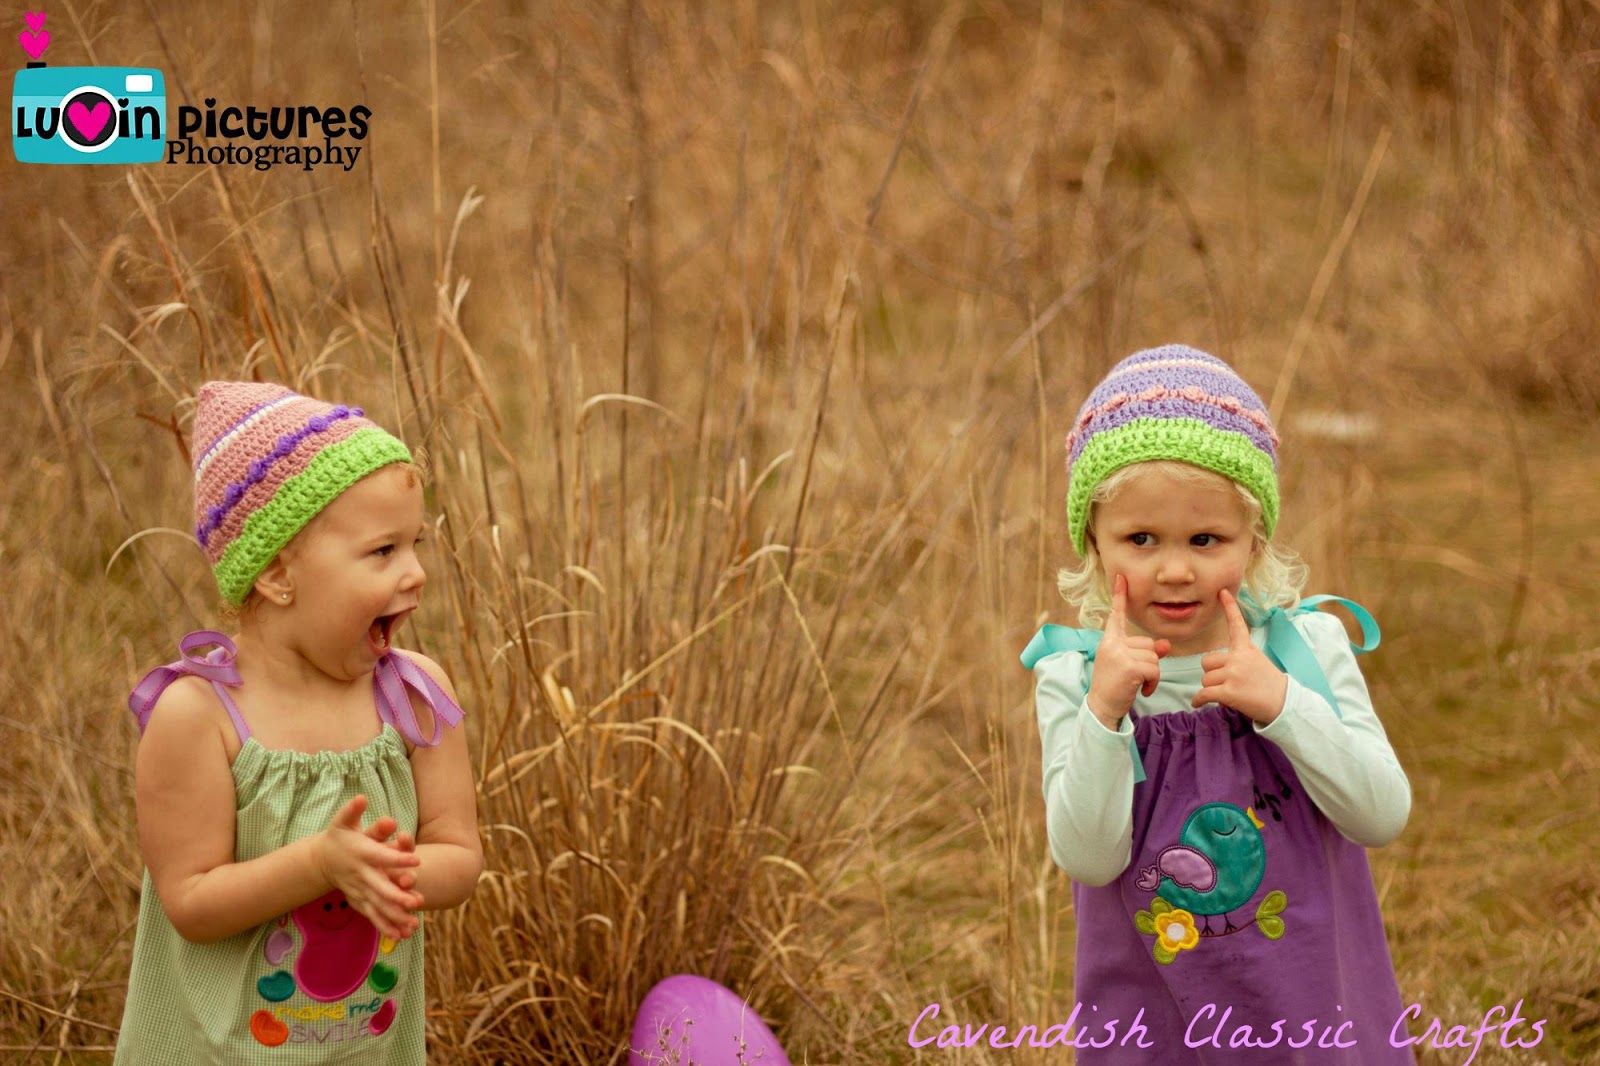
*Please note that using different yarn weights and hook sizes will give you far different results with your chick.  If you want a tiny chick to fit inside of the large plastic eggs you find in most craft stores, I recommend using a fingering or sport weight yarn with a G Hook.


As you can see, they are quite different in size.  My daughter seems to thoroughly enjoy having one that is large enough so that it can be snuggled though.  
The faces are completely sewn on, so no small parts(choking hazards).  That makes these little chickies the perfect Easter gift for kids of all ages, from baby and up!
Now for instructions on how to make your own!


You will need......

Materials:
Yarn (the choice is really up to you; for a small chick, go with a 2 or 3 weight, for larger, go with a worsted weight)
G or H hook (once again, entirely up to you; keep in mind the smaller the hook and yarn, the smaller the bird and vice versa)
Embroidery floss
Needle and thread (you can substitute floss for thread)
Felt (you will literally need the tiniest bit of felt for this, preferably orange or yellow)
Scissors
Yarn needle
Polyfill stuffing
and a cup of coffee (optional, but if making yours first thing in the morning, as I was, I recommend it ;) )


Instructions:  working in continuous rounds/DO NOT JOIN
Round 1:  ch2, 6sc in beginning ch
Round 2:  2sc in ea. (12sc)
Round 3:  2sc in one st, sc in next, repeat around (18sc)
Round 4:  2sc in one st, sc in next 2, repeat around (24sc)
Rounds 5-10:  sc around (24sc x 6 total)
(Here I recommend marking your beginning stitches.  I like to use a scrap of yarn in a different color. I know there are all kinds of fancy stitch markers out there, and I have even considered purchasing or making some, but truth be told, I think a scrap of yarn works better.)


*Begin stuffing your chick now, making sure to stuff firmly.


Round 11:  sc2tog, sc in next 2, repeat around 5 more for a total of 6 times (18)
Round 12:  sc2tog, sc in next, repeat around 5 more for a total of 6 times (12)
Rounds 13-14:  sc around (12sc x2rows) *note: if you don't want much of a "neck", you can just do one row here.)
Round 15:  2sc in one, sc in next, repeat (18)
Round 16:  2sc in one, sc in next 2, repeat (24)
Round 17:  2sc in one, sc in next 3, repeat (30)
Round 18:  2sc in one, sc in next 4, repeat (36)
Rounds 19-24:  sc around (36 x 6 rows)
Round 25:  sc2tog, sc in next 4 (6x)
Round 26: sc2tog, sc in next 3 (6x)
Round 27:  sc2tog, sc in next 2 (6x)
Round 28:  sc2tog, sc in next (6x)

Round 29: sc2tog, (8x to close), join with slst, cut and tie off.  Hide tail inside chick.

Wings:  make 2
Round 1:  ch2, 6sc in beginning ch
Round 2:  2sc in each (12sc)
Rounds 3-4:  sc around (12sc x2rows)
Fold in a semi circle & sc first few stitches together.......


Work hdc's in the remaining open stitches of wing and join with slst, cut (leaving a long tail for sewing) and tie off.
Using yarn needle, attach wings to side of bird.  I like to use a jointed stitch by sewing through the side of the chick and the other wing.  This way, the wings move a little.  Don't pin down the entire wing; you want them to stick out a little bit.

Next is the face....
Using the yarn needle and embroidery floss, sew on some little eyes.  You pretty much can't go wrong here.  Then you just pull the remaining floss toward the back of the head and cut, hiding the tail inside the chick head.
Cut a small triangular scrap of felt and sew it with needle and thread(or floss) to the face, just below the eyes.  Once again, you hide the thread tails in the head.

Now he is finished!  You have your Easter chick!


Now go make some chicks to fill those baskets or hide in some plastic eggs!  Perhaps it could be the prize in your egg hunt this year.
While you're at it, head on over to Craftsy or Ravelry and pick up my new Egg Hunt pattern, the perfect accessory for your little one's Easter egg hunt this year!