Thursday, September 19, 2013

Ladies Shrug CAL Progress

 I have been cruising along this week on my Ladies Shrug/Cardigan for the CAL, and I just can't wait to wear it!  The weather in New England has been very chilly this past week, so all the more reason to speed things up.
 The more rows I finish, the more I am LOVING these colors!  It's a tonal alpaca/wool/acrylic blend, so not only are the colors fabulous, but it will be super soft, warm, and lightweight.  What more could you want in a sweater?
The excitement of creating my very first sweater (well my first sweater for an adult) has me in full blown sweater mode.  I have been finding myself glued to pinterest and ravelry lately looking for more sweaters to create.  I have a vision of crocheting myself an entire fall wardrobe (never gonna happen.lol), and I am planning my next piece.
Can you believe the fabulousness (not a word? it should be) of this textured sweater?!  The colors are perfection too; utterly autumn :)
It is done in tunisian, which means that it's time for me to learn a new technique.  I have been wanting to try it for a while, and I think this sweater is the perfect motivation, don't you?
But before I attempt the tunisian sweater, this cute cabled v-neck is next on my agenda.  It is another great pattern from my favorite designer, Mon Petit Violon, and I'm hoping I have enough of my yarn leftover to make it for my daughter.
Perfect for boys and girls, I think I will have to make several of these this season for all the kiddos in the family.
So, are any of you taking part in the CAL?  I know several people had shown interest last month and purchased the pattern.  I would love to hear about your progress, and even better, see some pics!
Here is a progress pic from the ever so talented Lisa, over at I Crochet It!  Great job Lisa, and I look forward to seeing more!
Please feel free to comment below about your progress or any current fall weather projects you are working on.

Sunday, September 15, 2013

Party Princess and CAL Progress

 I can't believe my little girl is already 3 years old!  It doesn't seem possible, and yet it is.  I spent the week leading up to her birthday in part preparing, but mostly just watching her and marveling at how she has grown.
I can see how her features have changed over the past year; she no longer has that baby/toddler face.  She is a big girl, and mommy has mixed feelings on the matter.
She has grown to love all things "princess" over the past year, and I figured a princess party was in order.  Her favorite (as was mine as a child) seems to be Cinderella.  So I set out to make her a Cinderella-esque dress (I know, not a real word) for the party.
 I had no real plan for the dress or pattern to follow; I kind of just made it up as I went.  I had serious doubts on whether it would be finished in time.  We plan on this doubling as her Halloween costume this year, and I knew it would be done by then, but by her birthday?  
Stayed up till 2am the day of the party, ran out of both colors of yarn, but somehow made it work.  I had plans for a white puff sleeve, but went with sparkly silver tulle instead, and I am loving the end result!
 As you can see, she loves it too!
And that's what it's all about.
 A pattern will be coming shortly; I just have to get it written down (I know, I should write it down as I go, but I never learn).  It is for about a 4T, but I will explain how to make it to fit whatever the measurements may be.
 Her party was at her favorite park and spent with family and friends.  She had a wonderful time playing with her cousins, opening presents, eating cookies and cake, and just being 3!


 She finally braved the tunnel and the bridge at the playground (unable to do them at age two, she's a big girl now, and big girls do those things. Heehee)
 A very rare event: a family picture!
It's so hard to get a good pic of the three of us together, and I love this one!
 My big girl on the "big girl" swing, because in case you didn't know, she's 3 now, which means no more baby swing.  Posing with her cousins for a photo op.  She had a blast with these two on the playground.  It's so nice to have family around, though we don't see them often enough.
 In other news, I am still making progress on my CAL sweater, albeit not much this past week.  Now that customs and party planning are over, I should have time to focus on the Ladies Shrug/Cardigan Crochet along.

I am loving the yarn that I ordered online!  It's soft and the colors are perfect!  They are so me and so autumn!  Are any of you working on the sweater too?  I would love to see progress pics and hear how things are coming along.  Please feel free to comment below and on my facebook page.

Friday, September 6, 2013

Prelude to a CAL: The Perfect Sweater!


My big crochet plans for the month though are for my very own sweater!  I have already purchased the pattern (Ladies Shrug/Cardigan from Mon Petit Violon), and now my yarn is on its way  has arrived from Turkey (it's a wonderful alpaca blend that will be oh so cozy).
Here's a little peek at it:
We awoke this morning to very cold temps here in New England, which means sweater season is rolling in!  Yay!
I began today in the car while running errands.  I opted for the medium size of the pattern, and attempted it with a size H hook, thinking the G would make it too small.  I was wrong, and stupidly didn't make a swatch.  I know, I know, big mistake!  I figured with the measurements that she offers after Row 2, it would be ok.  That's when I discovered that I should have gone with a G hook after all.
So, I have started over this evening, size Medium, with a G hook, and it is coming along quite nicely.  I am not sure how much progress I will make this evening, but I am excited to see how this turns out!

If you are planning on joining in on the CAL, I would love to hear about your progress and see pictures, which you may post here with links or on facebook.  I will post at least weekly on my progress, and while there is no deadline, I am hoping to be able to enjoy the sweater this fall.

Friday, August 23, 2013

Autumn's On Its Way

You can feel it in the air: fall is on its way!  Yay!  By far my favorite season; the weather, the colors, and the clothes are all perfect!
Here a several items available in my shops for the coming fall season:
Indian Summer Tank/Dress pattern available here: Etsy, Ravelry, and Craftsy
The Aurora Slouchy Hat pattern available here: Etsy, Ravelry, and Craftsy
Adorable little bow dress available for custom orders(pattern: Mustard Bow Dress by Mon Petit Violon).  Find Etsy listing here for the sleeveless version: https://www.etsy.com/listing/154802731/little-bow-dress-made-to-ordernewborn?ref=shop_home_active
Crocheted Baby Boots (0-6 months) available at this Etsy listing and by custom request: https://www.etsy.com/listing/158111494/crocheted-baby-booties-winter-boots-0?ref=shop_home_active
Yellow Capped Sleeve Cardi adorned with fall themed buttons: https://www.etsy.com/listing/106394815/girls-yellow-cotton-capped-sleeve?ref=shop_home_active

Just a few of the items available for the cooler months ahead.  Check out my entire stock of finished/custom items and patterns in my Etsy shop (some pattern pack deals available).
If there you can't find what it is you're looking for, please feel free to contact me for custom orders.

Wednesday, August 21, 2013

My Quest for the Perfect Sweater

Fall is almost here!  My favorite season, due in large part to the amazing clothing and colors that emerge at this time of year.
While working on my current custom order and browsing through Ravelry and Pinterest (both highly addicting), I decided that this year I was going to make myself a sweater.  I don't make things for myself often, and I really don't make big items due to the supply costs and time factor.  When I make garments, they are baby/children sizes (you know, instant gratification), because they can be done quickly and without too much yarn.  Besides, I love making clothes for my daughter, and she loves wearing homemade clothing!

But I REALLY, REALLY want to make myself a sweater!  I love sweaters of every kind: cowl neck, boat neck, fair isle, long sleeved, 3/4 length, cardis, etc.  So picking the perfect sweater was no easy task.
The above sweater, by Mon Petit Violon, has been on my dream to do list for quite some time, and despite looking at all of the other options, I keep coming back to it.
It's gorgeous, don't you think?  I love the style of it (as in, it looks like something I could actually wear), and because I have done several of her patterns before, I know I will enjoy this.

Here were a couple of others I found on Pinterest along the way....


....and while both are gorgeous, I think I found the perfect one!  Plus, there's always next year.

As far as this year goes, I will be making the Ladies Shrug/Cardigan by Mon Petit Violon.  I am excited to crochet my first sweater for myself, and after discussing this with fellow crocheter Lisa, from I Crochet It, I've decided to make this a CAL (Crochet Along)!

 I have never taken part in a CAL before, but I think this could be a lot of fun!  Several people have already shown an interest in joining along.  If you would like to take part in this, you can begin by going to any one of Mon Petit Violon's pattern stores: Ravelry, Craftsy, or Etsy, and purchase the pattern.  
Next is the fun part of picking the color(s)!  I think I have finally figured out the yarn I will use, after much late night perusing online, and I hope it will still be available come payday.

I will begin in September, so there's still a couple of weeks to prepare.  There won't be sign ups or deadlines; just a carefree manner of sharing progress and tips.
I will post weekly on my progress, and you all are free to post your pics on my facebook page or links to your own blogs or albums in the blog comments.  If there is enough interest, I may just start a Ravelry group.
I'd love to hear from you all.  Let me know your thoughts on this.  How many of you would like to take part in something like this here?  Any suggestions?
I appreciate your feedback!

Tuesday, August 20, 2013

Graph in Progress and Future Free Patterns

I am completely overwhelmed by the amount of views my last post received (the Celtic Carryall free pattern)!  It is now my most popular blog post to date, and I would love to offer you all several new free patterns in the future.  I have a flying disc and a skirt pattern that I have been meaning to put into writing for some time now, so they will be coming along shortly.
 The flying disc, or as we call them in my house, Orbees (hubby named them, heehee), are very easy to make and work up quite quickly.  
The above skirt (made in Minnie Mouse style for my daughter's Halloween costume last year) is very simple and adaptable.  I hand sewed some lace and polka dots to this one, while the one below, was simply crocheted in two different colors.  Length and waist are fully adjustable, for long term wear.
I also have several patterns in progress that I am hoping to be able to add to my pattern shops this fall.

In the meantime, I have been working on my first graphghan for a custom order.  I have wanted to try one for the longest time, but must admit I was a little daunted by them.  When this order came along, with a request for a baby blanket, where the daddy is a huge Boston Bruins fan, I decided to bite the bullet and jump in with both feet.
I searched around online for the logo (not being a major sports fan myself, I needed to get acquainted with the design), and as luck would have it, I found a graph.  It was a rough start, between a possible discrepancy in the pattern, the tangling of many yarns, and my fear and frustration with this being my first crocheted picture.  But, I must say that I have fully enjoyed seeing the logo take form, and once I hit the halfway point, it became far less intimidating.  I will hopefully be finished soon, and am looking forward to future graph designs.


I am planning on writing my own next time though.  Perhaps some word charts are in my future.  I know my daughter would love a Dora blanket, and I'm trying to get that done for Christmas this year, so perhaps my first word chart will appear here as a free Dora design.....

Friday, August 2, 2013

Free Pattern!- The Celtic Carryall

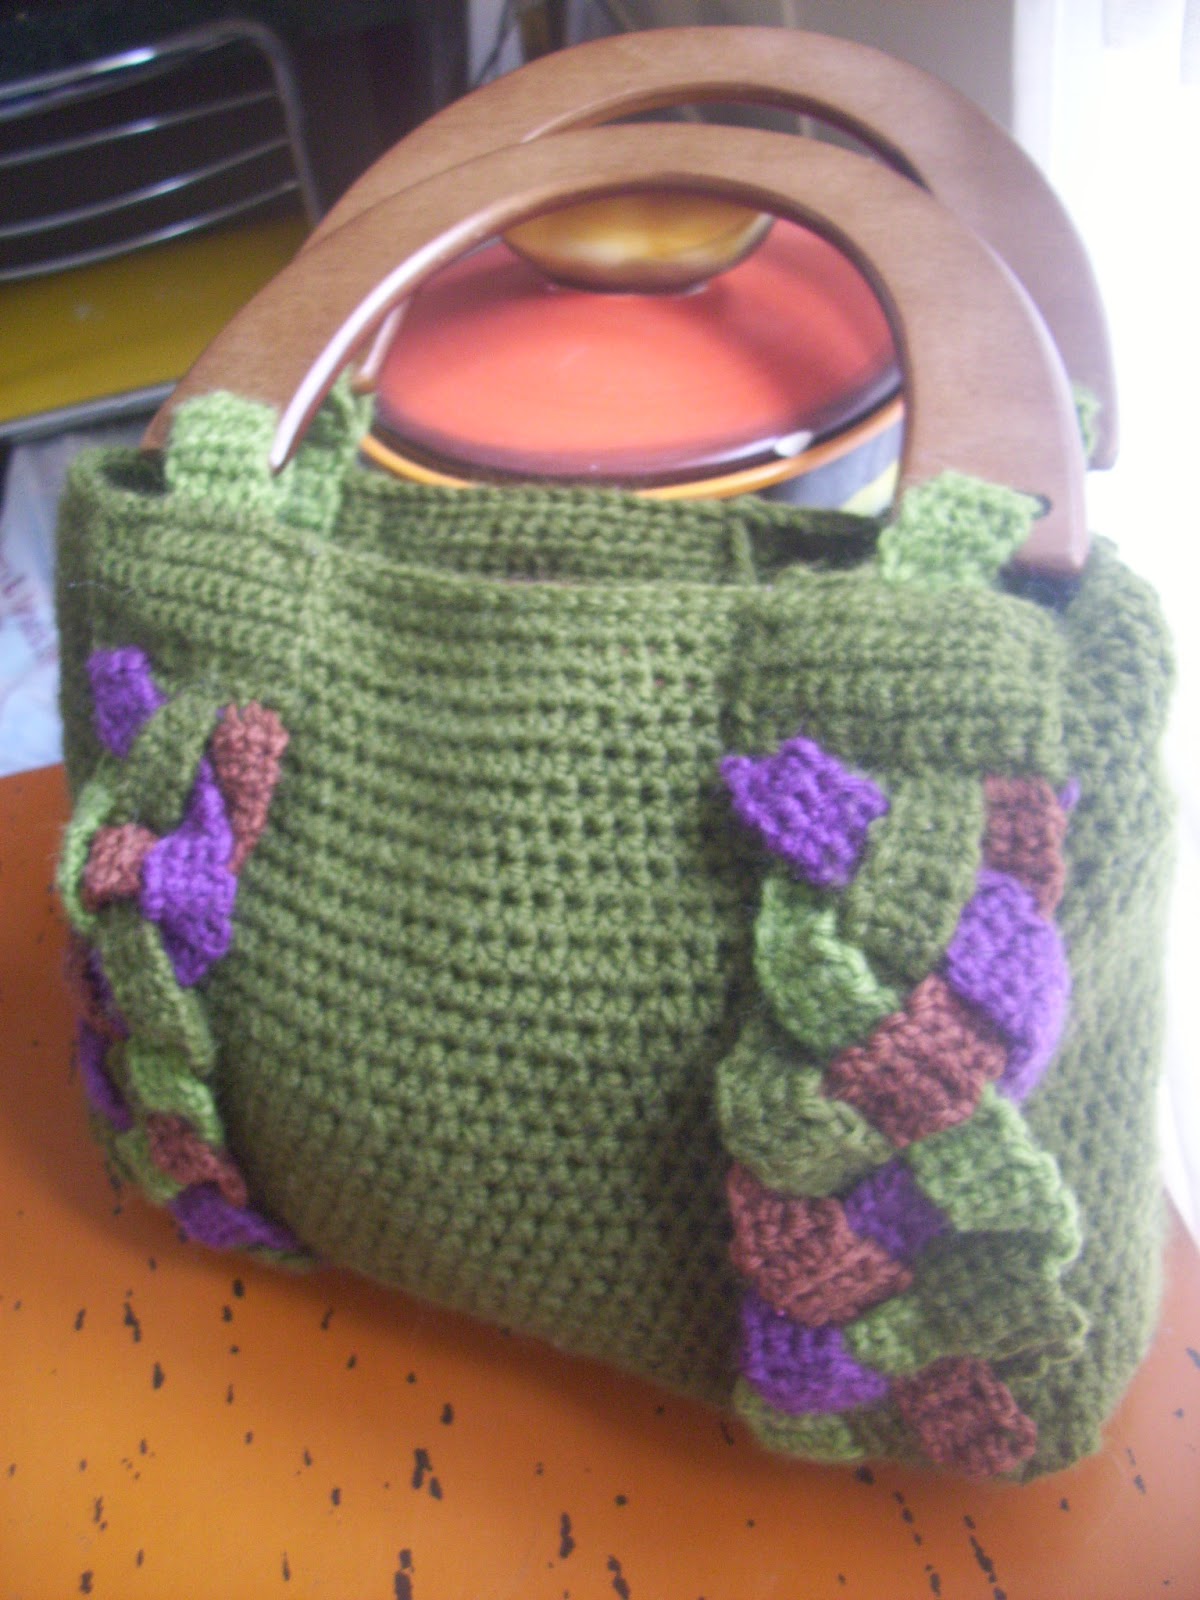
A while back, I came up with this pattern for my Celtic Carryall purse, and I've decided to list it here as a free pattern for all of you!
This is a great bag; it's roomy and fashionable!  Though this bag doesn't necessarily need a lining (I have been using mine without one), I know many of you like your crocheted bags lined.  I will eventually get a tutorial up on how to line a bag, but for now, here are a few links to other sites that will show you how:

The bag is fairly simple, and includes a few handle options too.  I used wooden handles that I purchased at Joann's Fabrics, but you can crochet your handles too.


Here is the pattern:


*Note- I used Lion Brand Wool Ease to create this bag, though any medium worsted weight yarn 
would do. I recommend using one that is more stiff however, to hold the shape of the bag 
better. Red Heart Super Saver is a perfect cheaper alternative.
Your bag size will depend entirely upon what yarn you use, but the dimensions will be roughly: 
12" x 8.5"
A basic understanding of the following stitches are required for this pattern: slip stitch, single crochet, half double crochet and half double crochet decrease

Abbreviations:
ch- chain                     slst- slip stitch             sc- single crochet            hdc- half double crochet
hdc dec- half double crochet decrease

Materials:
Medium worsted weight yarn in 3-4 colors
G Hook
H Hook
J Hook
Yarn needle (for sewing the strap and embellishment pieces and all tails)


Additional Materials(optional):
The following materials are commpletely optional, but make nice additions to 
complete your bag. There are many free online tutorials for adding a lining 
to a crocheted purse.
Wooden handles (can be found at most craft stores)
or
4 rings for attaching shoulder straps (also found at most craft stores)
Fabric for lining
Magnetic button closure(or some other form of closure: button, zipper, snaps, etc.
Leather or thick/heavy fabric for bottom


Using J hook
Row 1: ch42, hdc in second ch from hook(counts as first hdc), hdc across(42hdc)
Rows 2- 13: ch2, turn, hdc in each st(42hdc)

Switch to H hook
You will now be working in the round with joins....
Round 1: ch1, turn and sc down the short side first(12sc total), working 2sc in corner 
stitch(one for each side), sc down the long side(41sc counting corner st), repeat for 
the remaining two sides, join with slst (There should be 12sc on each short side and 
41 on each long side, with 2sc's in each corner)
Rounds 2-3: ch1, hdc in same st, hdc around (12),41, (12), 41, join with slst
Round 4: ch1, *hdc dec in same st, hdc 8sts, hdc dec*, hdc 41, repeat from(*), hdc 41, 
join with slst
Round 5: ch1, hdc in same st, hdc around (102hdc)
Round 6: ch1, hdc in same st, hdc in next 33sts(34total, counting first st), hdc dec, hdc 
in next 45sts, hdc dec, hdc in remaining sts (100hdc)
Rounds 7-26: ch1, hdc in same st, hdc around, join (100hdc)
Round 27: ch1, sc in same st, sc around, join (100sc)
Round 28: slst around, join, cut and tie off. Sew in tail.

Straps:
There are 3 options for straps on this bag.
The first option (pictured) is adding two wooden handles.
The second is done in a similar fashion, but uses 4 rings to connect two shoulder straps.
The third uses no rings, and is achieved by making two shoulder straps of sc.

Option 1:
Using G hook, main color, make 4
Row 1: ch13, sc in 2nd ch from hook and across (12sc)
Rows 2-9: ch1, turn,sc across (12sc)
Row 10: slst in first 4sts, hdc in next 4, slst in next 4, cut (leaving a long tail for 
sewing piece to bag) and tie off
Sew these pieces to your bag, 2 in the front, 2 in the back. Make sure you only sew 
down the sides of the front pieces(you will sew down their bottom edges later), so you 
can attach your braided embellishments.
Using G hook and second color, make 4
Row 1: Join to first hdc at top of last piece, ch1 and hdc in same st, hdc across (4hdc)
Rows 2-12: ch1, turn, hdc across
Cut and tie off, leaving a small tail for sewing.

Celtic Braid Embellishment:
Using a G Hook, attach these to 2 of your wide strap attachment pieces
You will need all of your colors here (if using just 3 colors, you will have to double up 
on one, but I recommend spacing them from each other.)
Color 1:
join with slst to first sc, ch1 and sc in same st, sc in next two sts,* ch1, turn, sc across 
3sts*, repeat from (*) for about 40 rows (count may differ slightly once you braid the 
pieces together, so leave long tails and don't tie off till braided. You will also need the 
tails to sew the pieces down.)


*Repeat this process with each color on your two front pieces, till you have a row of 4 
long pieces on each. Simply braid the pieces till you've reached the bottom of the bag. 
Then you will use their tails and yarn needle to tie and sew them down to the bottom 
edge of the front of the bag.
You may also finish sewing your front pieces down on their bottom edges.

Assembling your strap handles:
Once you have sewn all of your strap pieces to the outside of your bag, slip your thin 
strap pieces through your handle holes, and sew them down on the inside of your bag.


Option 2:
Repeat the above process for option 1, merely changing out your wooden handles for
4 rings.
Using H Hook, Make 2
When making your slip knot, leave a long tail for sewing to itself around ring.
ch 7, turn, sc across (6sc)
ch1, turn and sc across until you achieve the desired length of your strap. Cut, leaving a long
tail, and tie off.
Wrap the ends of the strap around the rings, and sew shut. Cut and weave in tails.

Option 3:
Using G hook, main color, make 4
Row 1: ch13, sc in 2nd ch from hook and across (12sc)
Rows 2-9: ch1, turn,sc across (12sc)
Row 10: slst in first 4sts, hdc in next 4, slst in next 4, cut (leaving a long tail for
sewing piece to bag) and tie off

Sew these pieces to your bag, 2 in the front, 2 in the back. Make sure you only sew 
down the sides of the front pieces(you will sew down their bottom edges later), so you 
can attach your braided embellishments.


Attach your embellishments, and pin down your front pieces as above.
Using H hook, join yarn(in strap color of your choice) to first st of top hdc, hdc across,
ch2, turn, repeat untill you achieve the desired length. (2x)
Leave a long tail at the end to attach to the top hdc on the other side.


I hope you enjoy this pattern, and if you have any questions, feel free to comment here or email me ( cavendishclassiccrafts@gmail.com ) anytime.  This has been tested, but there is always the possibility for error, so just let me know if you find any.
I would love to see your finished bags too, so please feel free to share links to your photos in the comments or post your pics on my facebook page!